Co-existence : IBM DB2 and MS SQL Server 2005 using Linked Server
Well, this article explains about connecting to an IBM DB2 Database using a Linked Server which is available in MS SQL Server 2005. The underlying connection is established through an ODBC connection. You can also use this Linked Server to retrieve data and execute updates, to and from IBM DB2 Database.
This method has proven very effective in a project which I recently worked on. Currently, it is being used to Synchronize data with an IBM DB2 Database which resides on an AS 400 system and a MS SQL Server 2005 Database.
Prerequisites :
You must have,
- IBM DB2 Server or Client Installed
- MS SQL Server 2005 Installed
Step 1 : Creating the ODBC Connection.
Navigate to Start -> Control Panel -> Adminitrative Tools -> Data Sources (ODBC)
 |
| Pic 1.1 - Select IBM DB2 ODBC DRIVER and Click Finish Button |
 |
| Pic 1.2 - Give a Name to the Data Source |
Remember to Select the Database alias of the IBM DB2 Database you want to connect to.
Specify the User Name and Password which is used to connect to IBM DB2.
Step 2 : Creating the Linked Server in MS SQL Server 2005
Navigate to Start -> All Programs -> Microsoft SQL Server 2005 -> SQL Server Management Studio
Give the Linked Server a name. Select Other Data Source for Server Type.
Select Microsoft OLE DB Provider for ODBC Drivers as the provider.
Specify the Product Name and the Data Source exactly as the Name you gave when creating the ODBC Data Source. It is TEST in this example.
Then move on to the Security Settings of the Linked Server and Select Be Made using this security context and specify the User Name and Password of the IBM DB2 Database.
Then move on to the Server Options Settings of the Linked Server and Set RPC, RPC Out as True (this is required since we are going to use Remote Procedure Calls when Inserting and Updating values of IBM DB2)
Finally Click on OK to complete the Creation of the Linked Server and we are ready to go.
Step 3 : Executing Queries, Inserts, Updates and Deletes On the Linked Server
Well this is the most Important and the Interesting part where we can check whether everything we did above really works or not. We will imagine a table named Employee exists in the IBM DB2 within a schema or a table space named BICDEV. Remember the name of our Linked Server is TEST.
Once you have created the Linked Server successfully. There are several ways to query from the Linked Server.
One way is,
SELECT * FROM [TEST]..[BICDEV].[Employee]
another way is,
SELECT * FROM OPENQUERY(TEST, 'SELECT * FROM BICDEV.Employee')
Now we will look at how we can Execute Inserts, Deletes and Updates to the Linked Server. Since we set the RPC, RPC Out values to True when we created the Linked Server we can use the following method to accomplish out task.
EXEC ('INSERT INTO BICDEV.Employee(Name,Age,Salary) VALUES
(''Tom'',24,350000)
) AT [TEST]
Well, we come to the conclusion of this small article on how to connect an IBM DB2 Database and a MS SQL Server Database using Linked Servers. While surfing through the internet I found out that there are many ways to do this. But this is something which I personally have worked on. And thought of sharing with you guys and gals.
I welcome any comments, suggestions and corrections related to the contents of this article.
 |
| Pic 1.3 - Once the ODBC is added, Click on Configure |
 |
| Pic 1.4 - Then give the Username and Password of DB2 |
 |
| Pic 1.5 - Test your connection by Clicking on Connect Button |
Step 2 : Creating the Linked Server in MS SQL Server 2005
Navigate to Start -> All Programs -> Microsoft SQL Server 2005 -> SQL Server Management Studio
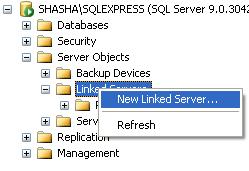 |
| Pic 2.1 - Click on New Linked Server |
 |
| Pic 2.2 - General Settings |
Give the Linked Server a name. Select Other Data Source for Server Type.
Select Microsoft OLE DB Provider for ODBC Drivers as the provider.
Specify the Product Name and the Data Source exactly as the Name you gave when creating the ODBC Data Source. It is TEST in this example.
 |
| Pic 2.3 - Security Settings |
 |
| Pic 2.4 - Server Options Settings |
Finally Click on OK to complete the Creation of the Linked Server and we are ready to go.
Step 3 : Executing Queries, Inserts, Updates and Deletes On the Linked Server
Well this is the most Important and the Interesting part where we can check whether everything we did above really works or not. We will imagine a table named Employee exists in the IBM DB2 within a schema or a table space named BICDEV. Remember the name of our Linked Server is TEST.
Once you have created the Linked Server successfully. There are several ways to query from the Linked Server.
One way is,
SELECT * FROM [TEST]..[BICDEV].[Employee]
another way is,
SELECT * FROM OPENQUERY(TEST, 'SELECT * FROM BICDEV.Employee')
Now we will look at how we can Execute Inserts, Deletes and Updates to the Linked Server. Since we set the RPC, RPC Out values to True when we created the Linked Server we can use the following method to accomplish out task.
EXEC ('INSERT INTO BICDEV.Employee(Name,Age,Salary) VALUES
(''Tom'',24,350000)
) AT [TEST]
EXEC ('UPDATE BICDEV.Employee SET Age = 24 WHERE Name=''Jerald'') AT [TEST]
EXEC ('DELETE FROM BICDEV.Employee WHERE Salary<=10000') AT [TEST]
Well, we come to the conclusion of this small article on how to connect an IBM DB2 Database and a MS SQL Server Database using Linked Servers. While surfing through the internet I found out that there are many ways to do this. But this is something which I personally have worked on. And thought of sharing with you guys and gals.
I welcome any comments, suggestions and corrections related to the contents of this article.

hey...
ReplyDeleteGreat and understandable tutorial. You have simplify this tutorial by providing screen shots, which can understand anyone who interested to programming. keep posting... well done..